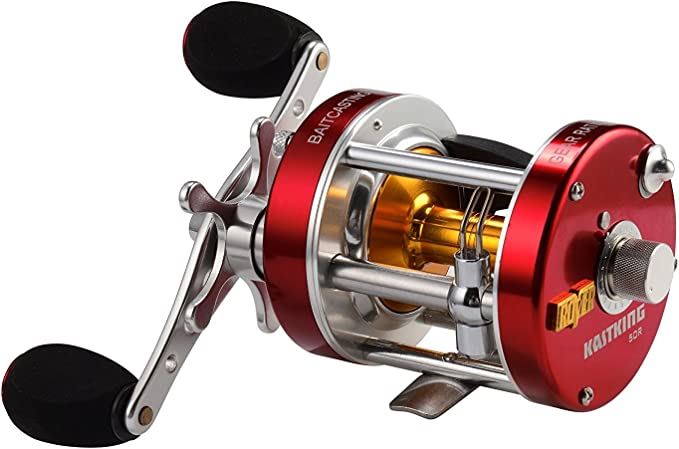
Taming the Beast: The Field Manual for the KastKing Rover

Buying a KastKing Rover is the easy part. Using it—truly mastering it without spending half your fishing trip picking out a bird’s nest—is the challenge. The Rover is an old-school round baitcaster. It lacks the modern “training wheels” found on low-profile bass reels. It doesn’t have a magnetic brake dial on the outside that you can lazily adjust. It requires mechanical empathy and a specific setup protocol.
Many negative reviews for this reel stem from a fundamental misunderstanding of its braking system or improper line spooling. This guide is not about how great the reel is; it is a technical manual on how to make it function flawlessly in the field.
The Challenge: Why Modern Anglers Struggle with Round Reels
The Inertia Problem
Round reels like the Rover 60 have heavy, deep spools. Aluminum is strong, but it has mass. Physics dictates that a heavy object requires more energy to start moving (startup inertia) and, crucially, more force to stop moving (rotational momentum).
When you whip a heavy 3-ounce catfish sinker, that spool spins up to thousands of RPMs instantly. When the sinker hits the water, the spool wants to keep spinning due to its mass. If you haven’t tuned the brakes to counteract that specific momentum, the line explodes off the spool faster than it can go through the guides. This is a backlash.
The “Braid Bite” Phenomenon
A recurring complaint in the Rover community is that braided line (PE line) gets stuck or “digs in.” This happens when thin, slick braid is wound under high tension over loose lower layers. The line literally cuts into the spool packing.
Worse, on the Rover, there is a minute tolerance gap between the spool edge and the frame. As noted by users like “Todd Graham” and “BTB,” thin braid can slip behind the spool, wrapping around the main shaft. This is a catastrophic failure that often requires tools to fix.
The Step-by-Step Setup Protocol
Step 1: The “Safety Backing” Layer (Critical)
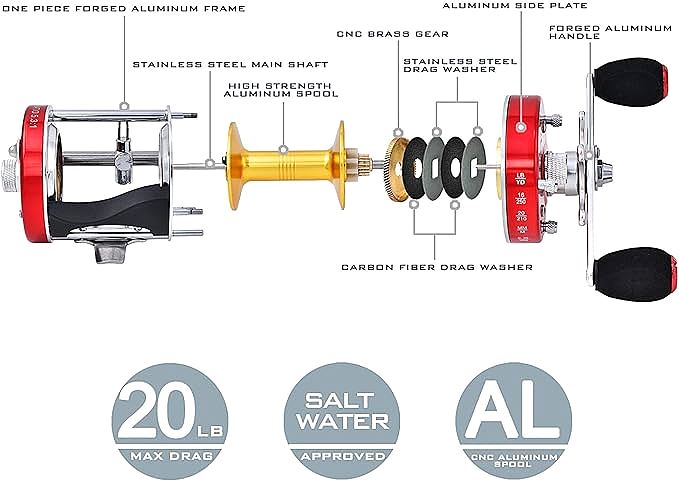
Never spool a KastKing Rover with straight braid. I cannot emphasize this enough. The spool is smooth aluminum. Braid has no stretch and low friction; it will slip on the arbor, making your drag feel broken even when it’s maxed out.
Furthermore, to prevent the “line behind spool” disaster:
1. Start with Monofilament: Spool the first 15-20 yards with thick monofilament (15lb-20lb). This acts as a grip for the spool arbor.
2. The Diameter Shield: This thick mono layer fills the tiny gap between the spool and the frame. If your braid tries to slip down the side, it hits the mono wall and stops.
3. The Connection: Use a Double Uni Knot or an FG Knot to connect your main braided line to the backing.
Step 2: Surgical Brake Tuning
The Rover uses a Centrifugal Brake System. Unlike magnetic brakes which use magnets to slow the spool via eddy currents (consistent braking), centrifugal brakes use physical friction blocks (pins) that rub against a race only at high speeds.
The Trap: You cannot adjust this from the outside.
1. Open the Reel: Unscrew the three knurled thumb screws on the handle side plate. (Do this on a table, not a boat dock, or you will lose the screws).
2. Locate the Pins: You will see plastic brake shoes on spokes attached to the spool.
3. The Rule of Opposition: Engage the brakes in pairs. If you engage one, engage the one directly opposite it to balance the spool.
* For Beginners: Engage 4 pins (pull them outward so they can slide). This maximizes braking force.
* For Distance: Engage 2 pins.
* The “Pro” Error: Do not turn them all off. The Rover’s heavy spool needs at least 2 pins to tame the startup flare.
Step 3: The Spool Tension Knob (The Micro-Adjust)
Once the internal brakes are set (coarse adjustment), reassemble the reel. Now use the small knob next to the star drag (fine adjustment).
The Drop Test:
1. Tie on your lure/weight.
2. Hold the rod tip at 10 o’clock.
3. Hit the thumb bar.
4. The lure should fall to the ground and the spool should stop spinning immediately upon impact.
5. If the spool overruns when the lure hits the ground, tighten the knob. If the lure doesn’t fall, loosen it.
Advanced Casting Mechanics: The Educated Thumb
The “Feathering” Technique
No mechanical brake is as smart as your thumb. With a round reel, your thumb should never fully leave the spool during a cast.
1. The Launch: Clamp down hard.
2. The Arc: As the lure flies, hover your thumb just above the line, feeling the “fluff.” If you feel line loops lifting up to touch your thumb, apply gentle pressure. This is “feathering.”
3. The Splashdown: This is critical. You must clamp the spool manually milliseconds before the lure hits the water. Relying on the brakes to stop the spool at the end of the cast is how 90% of backlashes happen.
Dealing with Heavy Payloads
The Rover is often used for “Lob Casting” heavy catfish baits (3oz sinker + cut bait).
Do not “snap” cast. A snap cast generates massive initial RPMs that the centrifugal pins can’t handle immediately.
Instead, use a sweeping motion. Load the rod deep into the backbone and swing the bait out. This accelerates the spool gradually, allowing the centrifugal brakes to engage smoothly as speed builds.
Targeting Profiles: Rigging for Success
The Catfish Winch
- Rod Pairing: Ugly Stik Catfish Special or similar E-Glass rod.
- Line: 50lb-65lb Braid (with the mono backing mentioned above).
- The Clicker: The Rover features a “Line Out Alarm” (clicker). This is mechanical, not digital.
- Usage: Cast out, tighten line, engage the clicker (switch on the side), and disengage the spool (press the thumb bar).
- The Strike: When a fish takes the bait, you will hear the audible clicking. The fish feels almost zero resistance. Pick up the rod, turn the handle to engage the gears (and lock the spool), then set the hook.
The Trolling Workhorse
- Rod Pairing: 7-9ft Medium Heavy Trolling Rod.
- Line: 20lb Monofilament or Lead Core.
- Capacity Management: Since the Rover 60 holds a massive amount of line, it’s ideal for trolling crankbaits or planer boards. The clicker here serves as a strike indicator while the rod is in the holder.
- Drag Setting: Set the drag loose enough that a strike pulls line (protecting the rod holder) but tight enough to set the hook. The Carbon Fiber drag shines here—it won’t stick when a Salmon hits at 3mph.
Maintenance: Keeping the Tank Running
The Rover is rugged, but it’s not sealed.
* The Worm Gear: The exposed worm gear (the part that moves the line guide back and forth) collects river grit, sand, and slime. This is the #1 failure point.
* Fix: After every muddy trip, take a toothbrush and clean the worm gear. Add a single drop of reel oil. Do not use grease on the worm gear—grease holds sand and turns into grinding paste.
* The Rinse: If using in saltwater (even brackish), tighten the drag fully (to seal the washers) and rinse with a gentle spray of fresh water. Loosen the drag for storage to prevent the washers from compressing.
By respecting the physics of the heavy spool and acknowledging the tolerances of the frame, the KastKing Rover transforms from a “frustrating cheap reel” into a reliable tool of harvest. It demands more from the operator than a $200 reel, but the reward is a level of durability that punches far above its weight class.